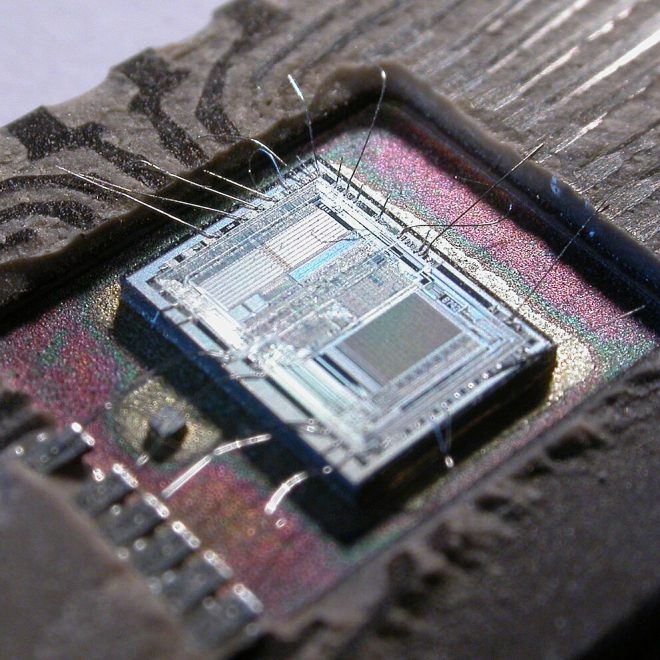
wuxing@name
  • Archives
  • Baby
  • CODING
  • About
wuxing@name
  • Archives
  • Baby
  • CODING
  • About
    个人日志

    Gunicorn FastAPI 宝塔Linux 部署

    by Andy 8月 26, 2021

    使用宝塔Linux 7.7.0 CentOS 7.5.1804 x86_64

    Linux环境下一直使用宝塔。在部署 FastAPI 时遇到困难。
    使用 Python项目管理器、Supervisor管理器,只能使用Python 的方式运行 uvicorn,或ssh 命令进入虚拟环境后运行gunicorn。无法直接使用 Gunicorn 运行FastAPI。

    source /data/python/project1_venv/bin/activate
    gunicorn main:app -w 4 -k uvicorn.workers.UvicornWorker -b 0.0.0.0:8751
    

    我没在网上找到基于宝塔Linux的 Gunicorn 运行FastAPI的成功案例。
    网上案例与本人实测,在使用 Python项目管理器 启动方式 Gunicorn 都会出现 内部错误,由于在日志上没有显示错误类型,也不知道问题所在。估计是程序没有适配FastAPI。

    解决方法、步骤

    一、程序打包、上传
    将程序文件、requirements.txt上传至服务器。

    pip freeze > requirements.txt
    

    二、使用Python项目管理器下载虚拟环境、模块(建议);
    (开发、部署环境相同时,也可以本地上传。)

    确认后,无需运行程序,本步骤仅为下载虚拟环境、模块。

    三、使用宝塔应用管理器
    添加应用

    应用环境需要选择与开发环境相同的环境,使用刚才Python项目管理器下载的环境,方法见下文。
    启动文件选择刚才Python项目管理器下载的gunicorn 模块
    执行目录选择项目目录;
    启动参数 根据项目填写:默认为:

    gunicorn main:app -w 4 -k uvicorn.workers.UvicornWorker -b 0.0.0.0:8751
    #或 使用刚才Python项目管理器 生成的conf文件 gunicorn.conf
    gunicorn main:app -c gunicorn.conf
    

    点击添加按钮,即可完成应用部署。

    应用环境部分说明

    启动文件选择使用的Python版本。
    如:/www/wwwroot/xFAPI_demo/xFAPI_demo_venv/bin/python

    如果配置文件提示
    !!! !!! WARNING: configuration file should have a valid Python extension. !!!
    将文件gunicorn.conf更改为 gunicorn.py再运行。

    import multiprocessing
    
    # 监听内网端口8000
    bind = "0.0.0.0:8751"
    # 并行工作进程数
    workers = multiprocessing.cpu_count() * 2 + 1
    # 监听队列
    backlog = 2048
    # 工作模式协程。
    worker_class = "uvicorn.workers.UvicornWorker"
    # 设置守护进程,将进程交给supervisor管理
    daemon = 'false'
    # worker_connections最大客户端并发数量,默认情况下这个值为1000。
    worker_connections = 2000
    # 设置日志记录水平
    loglevel = 'info'
    # supervisor管理gunicorn 日志输出到supervisor日志文件
    errorlog = '-'
    accesslog = '-'
    # 日志格式
    logconfig_dict = {
        'formatters': {
            "generic": {
                "format": "%(process)d %(asctime)s %(levelname)s %(message)s",  # 打日志的格式
                "datefmt": "[%Y-%m-%d %H:%M:%S %z]",  # 时间显示方法
                "class": "logging.Formatter"
            }
        }
    }

    参考文献:
    https://blog.csdn.net/sun_hentai/article/details/114878143
    https://www.sitstars.com/archives/86/
    https://blog.csdn.net/weixin_42881588/article/details/108768493

    8月 26, 2021 0 comment
    0 FacebookTwitterPinterestEmail
  • 个人日志

    DeepL机器翻译的力量

    by Andy 7月 7, 2020
    7月 7, 2020

    https://www.deepl.com/translat…

  • 个人日志

    net Core Rest Api 调用

    by Andy 7月 7, 2020
    7月 7, 2020

    RestSharp

  • 个人日志

    Oracle EM 安装 修复

    by Andy 5月 15, 2020
    5月 15, 2020

    EM经常会莫名其妙的无法登陆。 卸载 emca -decon…

  • 个人日志

    wpf c# login and Upgrade

    by Andy 12月 6, 2019
    12月 6, 2019
  • 个人日志

    Open SSL 证书生成 对exe 签名

    by Andy 11月 7, 2019
    11月 7, 2019

    set RANDFILE=C:.rnd set OPENSS…

  • 个人日志

    V-lang

    by Andy 6月 24, 2019
    6月 24, 2019

    早起的鸟儿没虫吃。

  • 数据库

    Oracle 13c OEM 安装

    by Andy 7月 4, 2018
    7月 4, 2018

    Oracle 13c OEM 安装

Load More Posts

About Me

About Me

Writer & Reader

Neque porro quisquam est, qui dolorem ipsum quia dolor sit amet, consectetur, adipisci velit, sed.

Recent Posts

  • Gunicorn FastAPI 宝塔Linux 部署

    8月 26, 2021
  • DeepL机器翻译的力量

    7月 7, 2020
  • net Core Rest Api 调用

    7月 7, 2020
  • Oracle EM 安装 修复

    5月 15, 2020
  • wpf c# login and Upgrade

    12月 6, 2019
  • Facebook
  • Twitter
  • Instagram
  • Pinterest
  • Tumblr
  • Youtube
  • Bloglovin
  • Snapchat

@2019 - All Right Reserved. Designed and Developed by PenciDesign


Back To Top